Cohort exams
Normally, Running Paper prints a unique paper for every student, with their name and a QR code on it. That’s the quickest way to mark, because Running Paper knows exactly whose paper is whose.
Sometimes that isn’t practical. For big mocks you often want one PDF that you print lots of copies of, hand out in the exam hall, and have each student write their candidate number on. That’s what a cohort exam is for.
What is a cohort exam?
Section titled “What is a cohort exam?”A cohort exam is an assessment set for a special kind of class, called a cohort exam class.
| Normal class | Cohort exam class | |
|---|---|---|
| What gets printed | One paper per student, each with the student’s name on it | One PDF, the same for everyone. No names are printed. |
| How students are identified | Automatically, from the QR code | The student writes their candidate number (or name) on the first page |
| Scanning | Any order. Pages can be shuffled, upside down or mixed together. | One paper after another. Each student’s pages must stay together. |
| After uploading | Marking starts straight away | You confirm which student each paper belongs to, then marking starts |
| Students in the class | Yes | No. The class has no students in it. |
The paper still has a Running Paper QR code on every page, so Running Paper knows which assessment and which page it is. It just doesn’t know which student it belongs to until it reads the first page and you confirm it.
When to use it, and when not to
Section titled “When to use it, and when not to”| ✅ Use a cohort exam when… | ❌ Don’t use a cohort exam when… |
|---|---|
| You’re running a mock exam or whole year group exam, for example in a hall. | It’s a normal class assessment. Use the class itself, it’s faster. |
| Reprographics or the exams office want one PDF to print in bulk. | You can print a named paper for each student without any trouble. |
| You don’t know exactly who will sit where, or the student list isn’t final yet. | You can’t make sure papers are scanned one student after another (see Step 5). |
| Students are used to writing their candidate number on exam papers. | You don’t want to confirm each student after uploading. |
Before you start: import candidate numbers (recommended)
Section titled “Before you start: import candidate numbers (recommended)”This step is optional, but it saves you a lot of time later.
When a cohort paper is uploaded, Running Paper reads the candidate number (or the student’s name) written on the first page and suggests which student it belongs to. For this to work, Running Paper needs to know your students’ candidate numbers.
- Go to Classes, then click All students in the top right to open the students page.
- Click Import candidate number.
- Upload a .csv, .xlsx or .xls file with two columns. The titles on the first row must be “UPN” and “Candidate number”.
If you skip this, it still works. Running Paper will try to match on the student’s name instead, and if it can’t find a match, you just pick the student yourself when you confirm.
Step 1: Create a cohort exam class
Section titled “Step 1: Create a cohort exam class”- Go to Classes and click Create class.
- Give it a clear name, for example “Y11 Maths Mocks Nov 2026”.
- Optionally add a subject and year group.
- Turn on Cohort exam class.
- Click Create class.
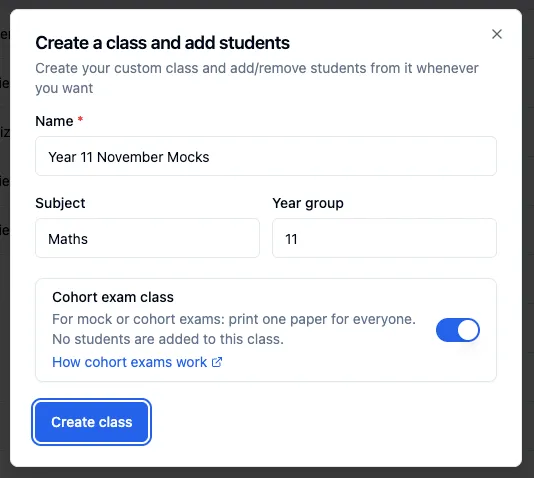
You won’t be asked to pick any students. That’s expected: a cohort exam class is always empty. Your new class shows a Cohort label next to its name in the Classes table, so you can always tell it apart from normal classes.
Step 2: Create the assessment
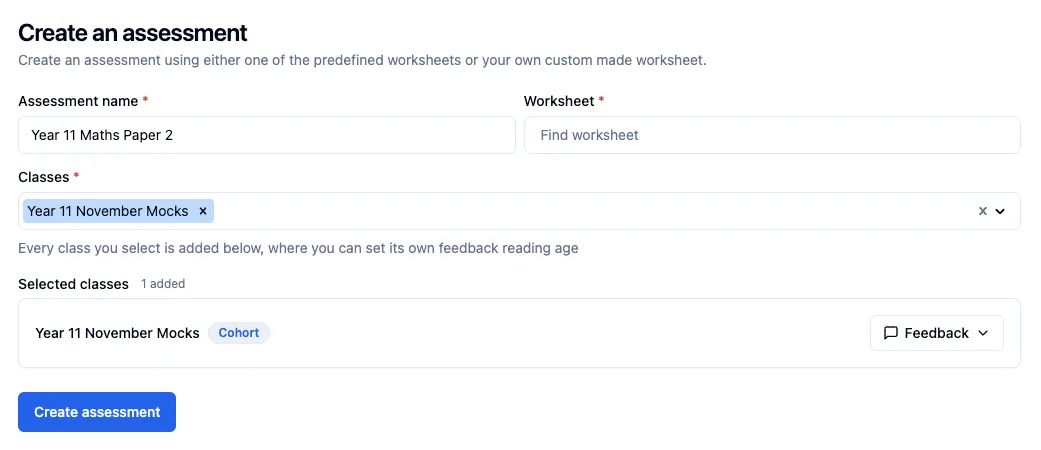
Section titled “Step 2: Create the assessment”Create the assessment exactly as you normally would. See Create an assessment.
When you pick the class, look for the Cohort label in the class list. Once you’ve selected it, the class also shows the Cohort label under Selected classes, next to the Feedback button. If you see that label, you know this assessment will print as one paper for everyone.
Step 3: Print one PDF
Section titled “Step 3: Print one PDF”Click the Print icon on the assessment, as described in Printing a unique paper for each student.
For a cohort exam class you only get Combined, which is one PDF. The Separate option isn’t available, because there’s only one paper.
Print as many copies as you have students.
Step 4: Students write their candidate number
Section titled “Step 4: Students write their candidate number”Hand out the papers. Before they start, tell students to write their candidate number clearly on the first page. Their full name is a useful backup.
Step 5: Bulk scan completed papers
Section titled “Step 5: Bulk scan completed papers”This is the step that’s different from normal assessments, so please read it carefully.
No names are printed on cohort papers, so Running Paper works out where one student ends and the next begins from the scan order. When it sees a page number it’s already had, it starts a new student.
The pages within a student’s paper can be in any order. For example, on a 6-page exam, scanning one student’s pages as 2, 3, 1, 4, 5, 6 is fine. Just don’t mix in pages from another student until that student’s paper is finished.
Before you scan, check every paper is complete, with no pages missing or stuck together.
Then scan and upload as normal.
Step 6: Confirm each student
Section titled “Step 6: Confirm each student”After uploading, open the assessment. Each cohort paper shows an amber Confirm status. Marking doesn’t start until you confirm who each paper belongs to.
- Click the confirm icon on a submission.
- Look at the first page and check the suggested student. Running Paper suggests one if it could read a candidate number or name that matches a student in your school.
- If the suggestion is right, click Confirm. If it’s wrong, or there’s no suggestion, click Select student, choose the right one, then click Confirm.
- Repeat for each paper.
Once a paper is confirmed, it’s marked like any other submission.