Mark your first assessment
A quick walkthrough of marking your first set of assessments, from setting up a worksheet to getting results back.
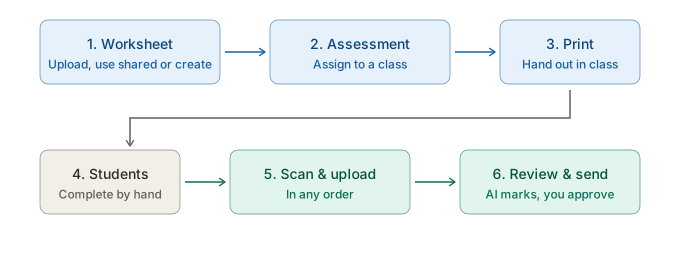
1. Set up a worksheet (if not already on the system)
Section titled “1. Set up a worksheet (if not already on the system)”If a colleague has already uploaded the worksheet you need, you won’t need to do this step. Worksheets are shared across your school (and across your trust, if you’re part of a multi-academy trust).
If the worksheet hasn’t been uploaded yet, you’ll need to set it up first. See upload a worksheet on how to do this.
2. Create the assessment
Section titled “2. Create the assessment”Go to the Assessments section and select Create assessment. Choose your worksheet, choose your class, then select Create.
3. Print and hand out
Section titled “3. Print and hand out”Click the three dots on the assessment and select Print. Each student’s copy is printed with their own QR code. Hand these out to your class.
4. Students complete the work
Section titled “4. Students complete the work”Students complete the assessment by hand with a pen, as normal.
5. Scan and upload
Section titled “5. Scan and upload”Collect the completed work and scan it all into a single file using your school scanner, the order doesn’t matter, and pages can be upside down or back to front.
Upload the file to Running Paper.
The QR code on each page tells the system which student it belongs to, so it can automatically sort the pages, mark the work, generate feedback, moderate the marking, and build your question-level analysis all ready for you to review.
6. Review and send feedback
Section titled “6. Review and send feedback”Open the assessment’s submissions and check any questions flagged for review - you can edit marks, feedback and then send them to students, parents or both.
You can also download the student’s work, QLAs, student reports and class reports.